Free Crochet Patterns for Old Time Baby Sweaters
(If you'd like to download a PDF of this pattern without ads, you can go here.)
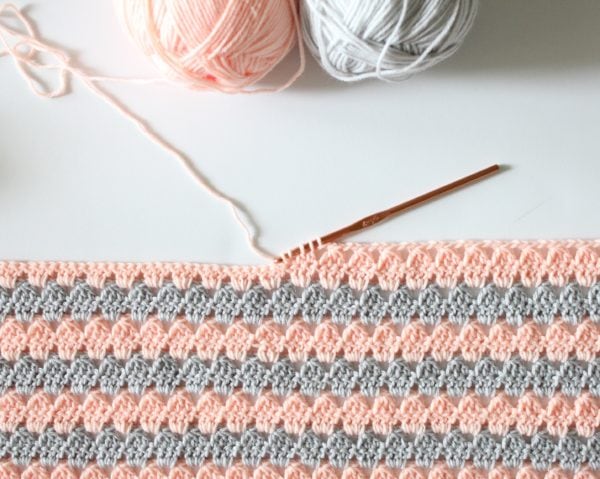
This modern crochet granny blanket is a series of triangles nestled in betwixt each other which gives the blanket a modernistic experience. This coating works up fast and is fun to memorize and option up hands where yous left off.
Materials
two each of Baby Bee Sweetness Delight in Bashful and Flannel)
Size H, five.00mm hook
Tapestry Needle
Scissors
Pattern

CH a multiple of three, then add 1 (three+ ane is the pattern repeat) to however wide you'd like the blanket. I usually exercise somewhere between 32 and 36 inches wide for a baby coating.
ROW 1: 1 DC into 4th CH from hook, *SK adjacent 2 CHs, three DC into next CH, repeat * ending with 2 DCinto concluding CH, turn.
ROW two: CH three, ane DC into next DC, (CH 3 counts equally first DC), *CH 2, DC3TOG, repeat * ending with CH ii, DC into adjacent DC, DC into top of turning chain, pulling through with new colour just before you cease the DC.
NEW COLOR
ROW 3:CH iii, 3 DC in the CH 2 space between the final DC3TOG and two DC of the previous row, *3 DC into side by side CH 2 space, echo * ending with i DC in top of the turning chain.
ROW 4: CH 4, (counts equally 1 DC and 1 CH), *DC3TOG in top of each 3 DC of previous row, CH two, repeat * across and end with CH 1, DC into top of CH 3 turning chain, pulling through with new colour.
NEW Colour
ROW 5: CH 3, 1 DC into DC (the base of the ch 3, the top of the terminal DC you fabricated), *3 DC in next CH 2 space, repeat * across ending with 2 DC into the pinnacle of 3rd concatenation of the turning chain.
ROW 6: CH 3, ane DC into the next DC, *CH 2, dc3tog, repeat * ending with CH ii, DC into adjacent DC, DC into third of ch three pulling through with new color simply earlier yous finish the sew.
Repeat rows 3-6 until you lot have a desired length of blanket.
I have made a video for my other Modernistic Granny Blanket in Peach and Blue that I think can aid you understand how to turn this coating and how to make the DC3tog. Watch beneath:
Notes
Here are a few tips I realized while making this blanket that might exist helpful to you.
Since each finished "triangle" (the DC that stack on each other) are nestled in betwixt each other, you will discover that the number of them will be different each color modify. For case, I did a small swatch to test the design and I ended upwardly with 8 "triangles in one row, then ix in the next, then back to 8 then back to 9. What I noticed are the rows that have eight are as well the rows where you accept ii DC and the end of the rows. The rows that had ix "triangles" only had 1 DC on the end.
Below is the border I decided to create and add around my blanket. I did a very zoomed in shot so you could see that I went around the whole blanket working 2 DC in each infinite. (To commencement the work with a new color, join in whatsoever corner and CH iii, that counts equally i of your DC) However, on the sides of the blanket, you lot volition be working 2 DC around the post of a DC. (await closely at the side by side moving-picture show of the finished blanket.)
Now, it might be the yarn I was using, my own personal tension, and yours may exist different, simply I did have to work a ch in between the two DC across the top and bottom. The sides did not need that actress concatenation. I tried doing it without, considering I wanted the stitch to match the sides, but information technology pulled and puckered. This to me is when you get to be smarter than the pattern. It's much better to work an actress stitch and have it await right, than get your counts exact. Once more, you might non have this problem.
For the corners on this round I did add a concatenation in between the ii sets of DC. (two DC, CH1, ii DC for the corners)

Standing on in the aforementioned direction for the 2d circular, join with the new color (flannel) and sideslip stitch i over and CH iii. (This gives the appearance of the get-go dc into the chain space. Then work one DC into the chain space. CH two and work 2 DC into the next space. Repeat this all the way around the coating, working 2 sets into each corner. When you return back to the original CH 3, sideslip stitch into the top of that.
Chain 3 and plough your work to become the opposite direction. I hope you are in a corner for this CH iii is the heart of the shell. DC 4 more times into that space and so SC into the next chain space. Y'all want to work vii DC into the next chain space, then ane SC into the adjacent chain space and repeat this all the way around. However, because I had problems on the sides being closer together than the top and bottom, I simply worked six DC. I institute that working half dozen showed no difference, but if I worked vii, the side shells were rippling. Again, this might not happen to y'all at all. When yous return to the corner you started with, work the remaining three DC and then slip stitch to the tiptop of the turning chain. Necktie off and weave in ends and you are done.
Extra Tips
For the corners, I was able to piece of work a complete 7 DC into each. Only, for a crocheter similar me who doesn't like to count, (I know, shhh don't tell) I felt so lucky that it but so happened to turn out that way. (sometimes my one SC turns out to be the corner stitch and it looks okay, just not my favorite.) If you are better at math than me and want to make certain yous are working the shell into each corner, you lot may want to add together more rounds of 2 DC until yous find you are exactly even.
Also, if that concluding part confused the heck out of you, don't practise information technology! I almost just left the border to be the rounds of ii DC. I thought it looked good sort of plain. But this is a souvenir and I decided to make it a little actress frilly.
And, only working all SC around this coating, switching colors would look great as well!

Expert luck! Click hither to see another version of this modern crochet granny blanket in peach and blue! As well, I'd dear to invite you to join up on Instagram . A lot of people use the #crochetersofinstagram hashtag and it's then inspiring to run across all the different work. I'm @daisyfarmcrafts if y'all decide to join! I also have a Facebook page, a Pinterest page, a Twitter account, a YouTube aqueduct all named Daisy Farm Crafts.
Whichever way is the best for yous, I'd dear to hear from you!
xxoo
Tiffany
Materials
- 2 each of Babe Bee Sweet Delight yarn in Bashful and Flannel
Tools
- Size H, 5.00 mm hook
- Scissors
- Tapestry Needle
Instructions
CH a multiple of 3 then add 1 (3+ 1 is the design echo) to all the same broad y'all'd like the coating. I normally practise somewhere between 32 and 36 inches wide for a baby blanket.
ROW i: 1DC into 4thCH from hook, *SK side by side twoCHsouthward, 3DC into nextCH,echo * ending with 2DCinto lastCH, turn
ROW 2:CH 3, 1DC into nextDC, (CH iii counts equally firstDC), *CH 2,DC3TOG, echo * catastrophe withCH 2,DC into nextDC,DC into peak of turning chain, pulling through with new colour just before y'all cease the DC.NEW COLOR
ROW 3: CH 3, 3DC in theCH 2 space betwixt the lastDC3TOG and 2DC of the previous row, *iiiDC into nextCH ii space, repeat * ending with aneDC in top of the turning chain.
ROW four:CH 4, (counts as 1DCand 1CH), *DC3TOG in peak of each 3DC of previous row,CH 2, repeat * across and cease withCH one,DC into top ofCH three turning chain, pulling through with new color.
NEW COLOR
ROW v:CH iii, oneDC intoDC (the base of the ch 3, the top of the terminal DC y'all made), *iiiDC in side by sideCH 2 infinite, repeat * across ending with 2DC into the top of third chain of the turning chain.
ROW vi:CH 3, 1DC into the nextDC, *CH 2,dc3tog, repeat * ending with CH ii,DC into nextDC,DC into third of ch 3 pulling through with new colour just before yous finish the stitch.
Repeat rows 3-vi until you accept a desired length of blanket.
Notes
Here are a few tips I realized while making this blanket that might be helpful to yous.
Since each finished "triangle" (theDC that stack on each other) are nestled in between each other, you will notice that the number of them volition exist dissimilar each color change. For example, I did a small swatch to test the pattern and I ended upwardly with 8 "triangles in one row, then 9 in the next, so dorsum to 8 and so dorsum to 9. What I noticed are the rows that have 8 are also the rows where you have ii DCand the end of the rows. The rows that had ix "triangles" but had 1DC on the end.
For the edge I went around the whole blanket working 2DC in each space. (To first the piece of work with a new color, join in any corner andCH 3, that counts every bit one of yourDC) However, on the sides of the blanket, you volition be working 2DC around the post of aDC. (wait closely at the next moving-picture show of the finished blanket.)
Now, it might be the yarn I was using, my own personal tension, and yours may exist dissimilar, but I did have to work a ch in between the 2DC across the top and lesser. The sides did non need that extra chain. I tried doing it without, because I wanted the stitch to match the sides, but it pulled and puckered. This to me is when you get to exist smarter than the pattern. It's much better to work an extra stitch and take it wait right, than get your counts exact. Again, yous might not have this problem.
For the corners on this circular I did add a chain in between the 2 sets ofDC. (2DC,CH1, 2DC for the corners)
Continuing on in the same direction for the second circular, join with the new colour (flannel) and skid stitch one over andCH 3. (This gives the advent of the first dc into the chain space. Then work oneDC into the chain infinite.CH 2 and work twoDC into the next infinite. Repeat this all the way around the blanket, working 2 sets into each corner. When you render back to the originalCH 3, slip stitch into the top of that.
Chain iii and turn your work to go the opposite direction. I hope you lot are in a corner for thisCH 3 is the middle of the beat out.DC 4 more times into that space and thenSC into the next chain space. You want to work 7DC into the next concatenation space, then aneSC into the next chain space and repeat this all the way around. However, considering I had bug on the sides being closer together than the top and bottom, I merely worked 6DC.
I plant that working 6 showed no difference, just if I worked 7, the side shells were rippling. Again, this might not happen to yous at all. When yous render to the corner you started with, piece of work the remaining iiiDC and then slip sew to the peak of the turning chain. Tie off and weave in ends and you lot are done.
For the corners, I was able to piece of work a complete 7DC into each. But, for a crocheter like me who doesn't similar to count, (I know, shhh don't tell) I felt then lucky that information technology just and then happened to turn out that manner. (sometimes my aneSC turns out to be the corner stitch and it looks okay, just non my favorite.) If y'all are meliorate at math than me and desire to brand sure you are working the shell into each corner, you lot may want to add more rounds of 2DC until yous find you are exactly fifty-fifty.
Also, if that last role dislocated the heck out of you, don't practise it! I almost just left the border to exist the rounds of 2DC. I thought it looked good sort of manifestly. Merely this is a gift and I decided to brand it a little actress frilly.
And, just working allSC around this blanket, switching colors would wait great likewise!
Recommended Products
As an Amazon Associate, I earn from qualifying purchases.
-

Clover Amour Zippered Case Crochet Hook Set
-

4 Pack Soft Tape Measure out Double Scale body sewing Flexible Ruler for Weight Loss Medical Body Measurement Sewing Tailor Craft Vinyl Ruler, Has Centimetre Scale on Contrary Side 60-inch
-

Mr. Pen- Pair of scissors, Kids Scissors, Pack of 6, Modest Pair of scissors, 5" Pair of scissors Kids, Craft Pair of scissors, School Supplies for Kids, Blunt Tip Schoolhouse Pair of scissors, Scissors for Kids, Child Scissors, Classroom Scissor
Source: https://daisyfarmcrafts.com/modern-crochet-granny-blanket/
0 Response to "Free Crochet Patterns for Old Time Baby Sweaters"
Post a Comment